importnumpyasnpa=np.array([[1357911][24681012]])# horizontal splittingprint('Splitting along horizontal axis into 2 parts:n'np.hsplit(a2))# vertical splittingprint('nSplitting along vertical axis into 2 parts:n'np.vsplit(a2))
Termín vysielanie popisuje, ako NumPy zaobchádza s poliami s rôznymi tvarmi počas aritmetických operácií. S výhradou určitých obmedzení sa menšie pole „vysiela“ cez väčšie pole, takže majú kompatibilné tvary. Vysielanie poskytuje prostriedky na vektorizáciu operácií poľa tak, aby k slučkovaniu dochádzalo v C namiesto v Pythone. Robí to bez vytvárania zbytočných kópií údajov a zvyčajne vedie k efektívnym implementáciám algoritmov. Existujú aj prípady, keď je vysielanie zlý nápad, pretože vedie k neefektívnemu využívaniu pamäte, čo spomaľuje výpočet. Operácie NumPy sa zvyčajne vykonávajú prvok po prvku, čo vyžaduje, aby dve polia mali presne rovnaký tvar. Numpyho pravidlo vysielania uvoľňuje toto obmedzenie, keď tvary polí spĺňajú určité obmedzenia. Pravidlo vysielania: Aby bolo možné vysielať veľkosť koncových osí pre obe polia v operácii, musí mať buď rovnakú veľkosť, alebo jedna z nich musí byť jeden . Let us see some examples:
A(2-D array): 4 x 3 B(1-D array): 3 Result : 4 x 3
A(4-D array): 7 x 1 x 6 x 1 B(3-D array): 3 x 1 x 5 Result : 7 x 3 x 6 x 5
But this would be a mismatch:
A: 4 x 3 B: 4
The simplest broadcasting example occurs when an array and a scalar value are combined in an operation. Consider the example given below: Python
importnumpyasnpa=np.array([1.02.03.0])# Example 1b=2.0print(a*b)# Example 2c=[2.02.02.0]print(a*c)
Output:
[ 2. 4. 6.] [ 2. 4. 6.]
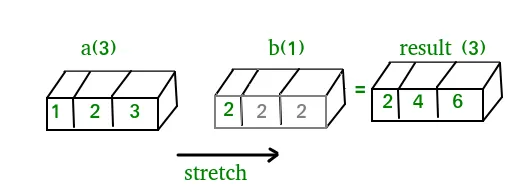
We can think of the scalar b being stretched during the arithmetic operation into an array with the same shape as a. The new elements in b as shown in above figure are simply copies of the original scalar. Although the stretching analogy is only conceptual. Numpy is smart enough to use the original scalar value without actually making copies so that broadcasting operations are as memory and computationally efficient as possible. Because Example 1 moves less memory (b is a scalar not an array) around during the multiplication it is about 10% faster than Example 2 using the standard numpy on Windows 2000 with one million element arrays! The figure below makes the concept more clear: In above example the scalar b is stretched to become an array of with the same shape as a so the shapes are compatible for element-by-element multiplication. Now let us see an example where both arrays get stretched. Python
V niektorých prípadoch vysielanie roztiahne obe polia, aby vytvorili výstupné pole väčšie ako ktorékoľvek z počiatočných polí.
Práca s dátumom a časom:
Numpy has core array data types which natively support datetime functionality. The data type is called datetime64 so named because datetime is already taken by the datetime library included in Python. Consider the example below for some examples: Python
importnumpyasnp# creating a datetoday=np.datetime64('2017-02-12')print('Date is:'today)print('Year is:'np.datetime64(today'Y'))# creating array of dates in a monthdates=np.arange('2017-02''2017-03'dtype='datetime64[D]')print('nDates of February 2017:n'dates)print('Today is February:'todayindates)# arithmetic operation on datesdur=np.datetime64('2017-05-22')-np.datetime64('2016-05-22')print('nNo. of days:'dur)print('No. of weeks:'np.timedelta64(dur'W'))# sorting datesa=np.array(['2017-02-12''2016-10-13''2019-05-22']dtype='datetime64')print('nDates in sorted order:'np.sort(a))
Output:
Date is: 2017-02-12 Year is: 2017 Dates of February 2017: ['2017-02-01' '2017-02-02' '2017-02-03' '2017-02-04' '2017-02-05' '2017-02-06' '2017-02-07' '2017-02-08' '2017-02-09' '2017-02-10' '2017-02-11' '2017-02-12' '2017-02-13' '2017-02-14' '2017-02-15' '2017-02-16' '2017-02-17' '2017-02-18' '2017-02-19' '2017-02-20' '2017-02-21' '2017-02-22' '2017-02-23' '2017-02-24' '2017-02-25' '2017-02-26' '2017-02-27' '2017-02-28'] Today is February: True No. of days: 365 days No. of weeks: 52 weeks Dates in sorted order: ['2016-10-13' '2017-02-12' '2019-05-22']
Lineárna algebra v NumPy:
Modul lineárnej algebry NumPy ponúka rôzne metódy na aplikáciu lineárnej algebry na ľubovoľné numpy pole. Môžete nájsť:
sled determinantu poradia atď. poľa.
vlastné hodnoty alebo matice
maticové a vektorové produkty (bodka vnútorný vonkajší atď. súčin) umocňovanie matice
riešiť lineárne alebo tenzorové rovnice a oveľa viac!
Consider the example below which explains how we can use NumPy to do some matrix operations. Python
importnumpyasnpA=np.array([[611][4-25][287]])print('Rank of A:'np.linalg.matrix_rank(A))print('nTrace of A:'np.trace(A))print('nDeterminant of A:'np.linalg.det(A))print('nInverse of A:n'np.linalg.inv(A))print('nMatrix A raised to power 3:n'np.linalg.matrix_power(A3))
Output:
Rank of A: 3 Trace of A: 11 Determinant of A: -306.0 Inverse of A: [[ 0.17647059 -0.00326797 -0.02287582] [ 0.05882353 -0.13071895 0.08496732] [-0.11764706 0.1503268 0.05228758]] Matrix A raised to power 3: [[336 162 228] [406 162 469] [698 702 905]]
Let us assume that we want to solve this linear equation set:
x + 2*y = 8 3*x + 4*y = 18
This problem can be solved using linalg.riešiť method as shown in example below: Python
importnumpyasnp# coefficientsa=np.array([[12][34]])# constantsb=np.array([818])print('Solution of linear equations:'np.linalg.solve(ab))
Output:
Solution of linear equations: [ 2. 3.]
Finally we see an example which shows how one can perform linear regression using least squares method. A linear regression line is of the form w1 x + š 2 = y a je to priamka, ktorá minimalizuje súčet druhých mocnín vzdialenosti od každého dátového bodu k priamke. Takže vzhľadom na n párov údajov (xi yi) parametre, ktoré hľadáme, sú w1 a w2, ktoré minimalizujú chybu: Let us have a look at the example below: Python
importnumpyasnpimportmatplotlib.pyplotasplt# x co-ordinatesx=np.arange(09)A=np.array([xnp.ones(9)])# linearly generated sequencey=[192020.521.522232325.524]# obtaining the parameters of regression linew=np.linalg.lstsq(A.Ty)[0]# plotting the lineline=w[0]*x+w[1]# regression lineplt.plot(xline'r-')plt.plot(xy'o')plt.show()
Output: Takže to vedie k záveru tejto série NumPy tutoriálu. NumPy je široko používaná knižnica na všeobecné použitie, ktorá je jadrom mnohých ďalších výpočtových knižníc, ako je scipy scikit-learn tensorflow matplotlib opencv atď. Základné pochopenie NumPy pomáha efektívne pracovať s inými knižnicami vyššej úrovne! Referencie:
 In above example the scalar b is stretched to become an array of with the same shape as a so the shapes are compatible for element-by-element multiplication. Now let us see an example where both arrays get stretched. Python
  V niektorých prípadoch vysielanie roztiahne obe polia, aby vytvorili výstupné pole väčšie ako ktorékoľvek z počiatočných polí.
  Let us have a look at the example below: Python
  Takže to vedie k záveru tejto série NumPy tutoriálu. NumPy je široko používaná knižnica na všeobecné použitie, ktorá je jadrom mnohých ďalších výpočtových knižníc, ako je scipy scikit-learn tensorflow matplotlib opencv atď. Základné pochopenie NumPy pomáha efektívne pracovať s inými knižnicami vyššej úrovne! Referencie: